Are you interested in how to start a blog? Great idea! But didn’t know the process to make a blog? If So, then you are at the perfect place.
Whether you want to make a blog out of passion or to make money through it, creating a perfect blog and starting blogging is a piece of cake, but only with the proper guide. When I created my first blog, it took me a lot much time to build one just due to the lack of information, but not now.
I am writing this step-by-step post on how to start a blog so that all the users willing to make one can do it properly. Just follow each of the steps carefully, and you will come to know that blogging is not as complicated as it looks at the start.
Table of Contents
Why Are You Starting a Blog?
Before moving further, just make a goal for your blogging and ask yourself if you are not sure why you want to start a blog. Is it just for fame? Is it to make your livelihood? Is it to bring your brand or product online? For is it out of passion or a dream?
If you are not clear about the goal, you want to achieve from your blog or don’t have much idea about it, then you might face some difficulties in making your blog.
A blog can help you to earn, promote your brand, sell your products, or to reach out to the community here with your thoughts or ideas.
A blog can also help you to enhance your writing and thinking skills, help to gain your confidence, to get in touch with some other networks of your kind, and much more.
If you are not clear with your intent of making a blog, then give some time to think about it and set a goal with your blogging, and then start a blog.
So, without talking about anything else, let us move to our topic of how to start a blog.
Starting a Blog Today in 10 Easy Steps
So finally let’s start with the tutorial on how to start a blog today.
1. Selecting a Perfect Niche for Your Blog
Before you make a blog, let’s talk about the niche you want for your blog and find out how to go forward with your niche to be profitable with the blog. If you don’t know what a niche is in blogging, then as per definition, a niche is a particular topic or subject on which your whole blog is going to be.
Selecting a niche for your blog is important as it is going to decide what your blog is all about and will let you choose the name of your blog as well.
How to Choose a Niche for your Blog
If you haven’t selected a niche for the blog you’re going to start and are not sure how to choose one, then I would recommend you choose the niche on the topic of which you have knowledge.
Your niche can be related to your job work, with your daily work, with any of your hobbies, or any other topic on which you have expertise. This way you will know what to write and how to move forward easily.
There are various popular niches to start your blog with like fashion niche, food blog, lifestyle, health, home decor, personal finance, fitness blog, a tutorial blog on any topic, and so on.
2. Choosing a Domain Name for your Blog
The domain name is the name of your website, your blog will be recognized and accessed online. In simple words, it’s a unique name for your blog.
A domain name is made up of two parts a name and an extension (.com, .net, .org, etc). The name denotes the website, and the extension is used to differentiate a normal website from some other particular site of the website.
The most common type of extensions to choose for your websites are .com, .net, and .org, if you want to target your brand or product in your country, then you can go for your country extension like .us, .uk, etc., as per your country.
There are many more kinds of extensions available, but these are the most commonly used extensions that you also have seen in your daily routine.
A domain is priced as per the extension of your domain but usually costs around $10 to $15 for extensions like .com, .net, .org. In this tutorial, I will teach you to buy the domain from Bluehost.
Steps to Buy a Domain
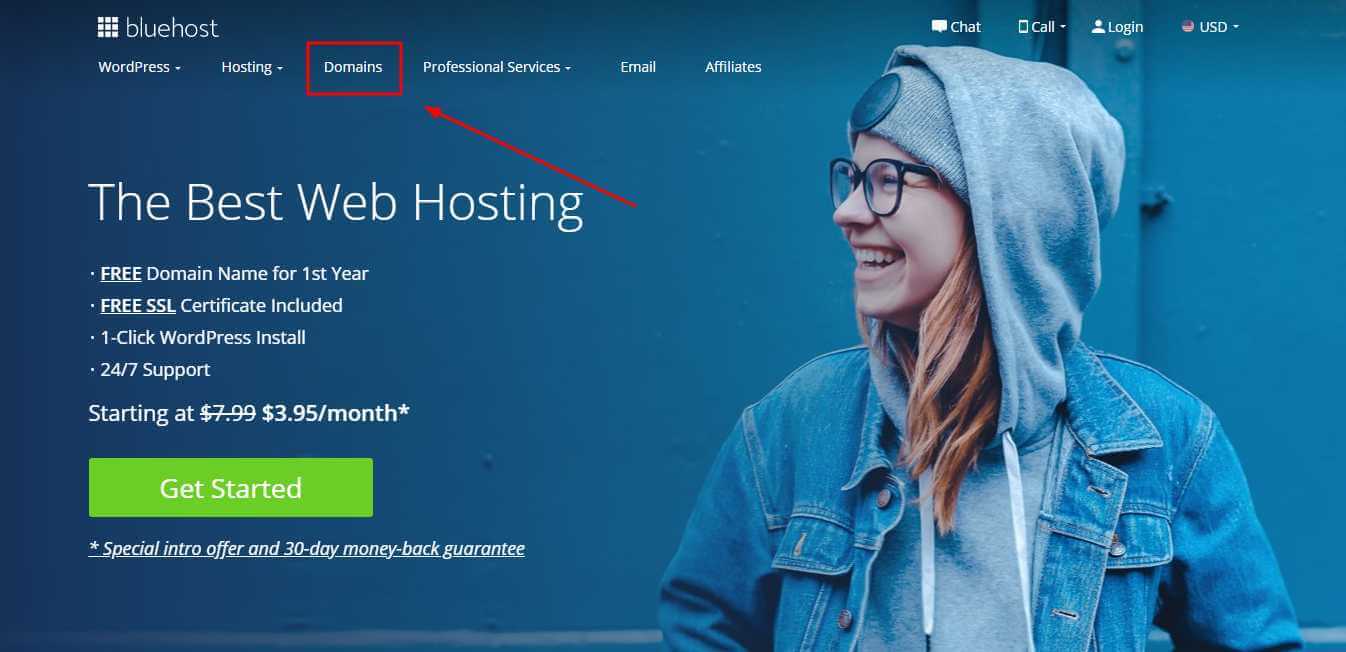
To buy a domain, first of all, visit the BlueHost homepage by clicking here and clicking on the Domains tab as shown in the image.
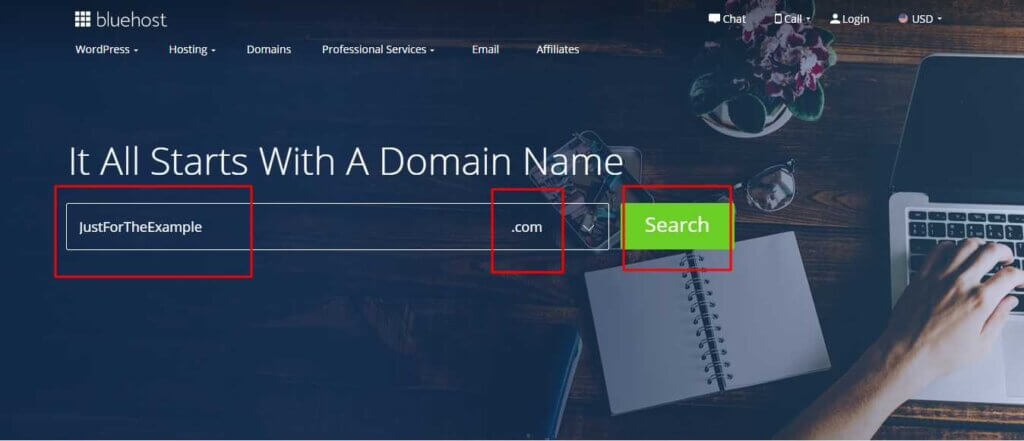
After visiting the domain tab search for your domain name in the given input tab and select the appropriate extension(.com, .net, .org) for your domain name you are willing to buy, and click on Search
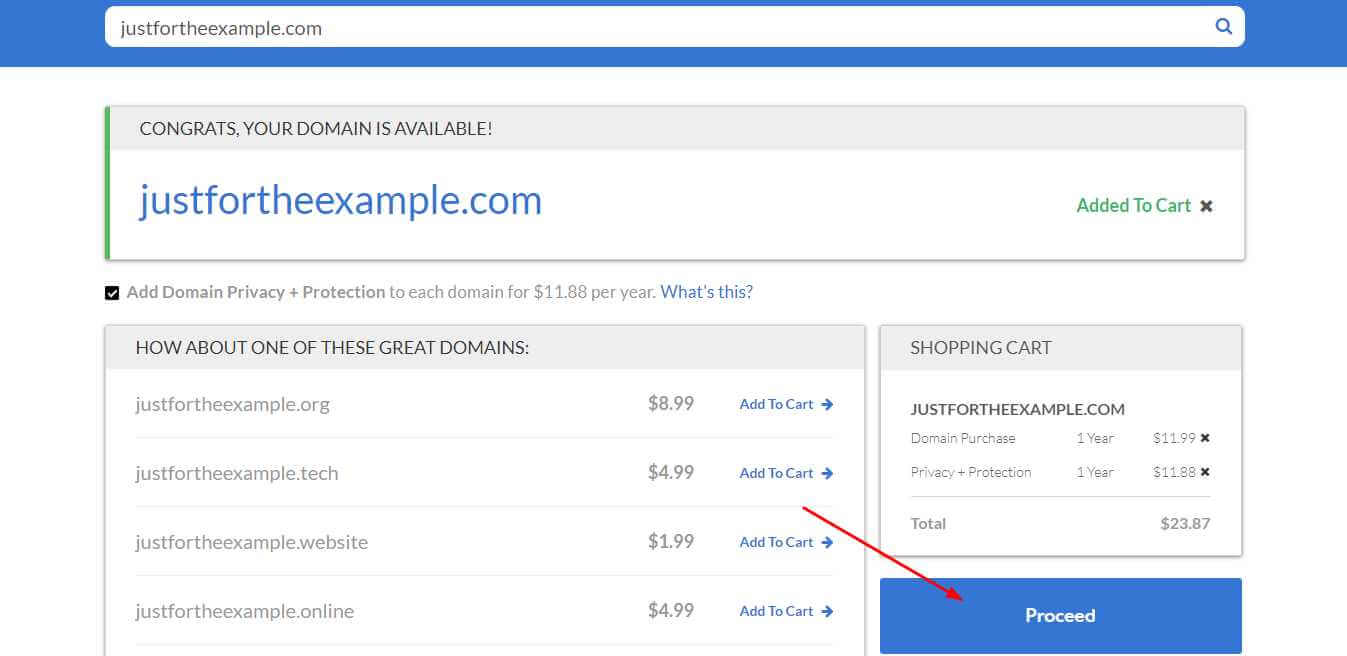
After that, it will take you to the next page where it will show you if the domain you are searching for, is available or not and will also show the bunch of available alternatives for you, have a look and buy if you like any or you can repeat the process with a different domain name of your choice.
As you can see, you will be having a bunch of different options available on the cart page of your Bluehost. just select the domain you like and click on Proceed.
After that, it will ask you for your personal information for signup and payment, Proceed with the payment and you will have your domain ready for setup.
3. Choose a Blogging Platform
After you have a domain, the next step is to select a blogging platform on which you will make your blog. There are various blogging platforms to choose from, such as WordPress, Blogger, Tumblr, Medium, Wix, etc. Each of the platforms has its advantages and disadvantages.
In this guide, we are going to use WordPress as the base to create the blog. WordPress is one of the top blogging platforms to choose from. WordPress consists of various free themes and plugins to use. It’s a surprise to know that 37% of the website running on the internet is powered by wordpress.
WordPress comes in 2ways either you can use WordPress as self-hosted platforms(using your own hosting and domain) or you can use their own system by WordPress.com to use their hosting and services in just a few clicks.
If you want to use WordPress.com fully automated system to make your blog, then follow my guide on How to Start a Blog on WordPress.com
As per my choice, using WordPress as a self-hosted platform provides you high flexibility and freedom than using the platform provided by wordpress itself. Even my website MyTechTalky is running over self-hosted WordPress.
4. Get an Appropriate Web Hosting
Web hosting is where you are going to keep your blog and all your data and files (Such as images, content, etc.). Hosting is a vital key if you want to earn from your blog, hosting ensures the performance, speed of your blog, availability of your sites 24×7 for your potential users.
The hosting company also provides you with the domain service as well and using the domain and hosting from the same company makes it more reliable for you to hassle-free management.
Give some time to research for good hosting web services and never go for hosting only for a reason it provides a service cheaper than others, always look for the performance and speed provided by that hosting company.
I have used the various hosting company and based on my experience, and I found BlueHost as the most reliable hosting for using it with WordPress. Even most of the top bloggers also recommend and use BlueHost as their hosting provider due to its performance and optimization.
How to Buy Hosting From BlueHost
Not sure how to buy a perfect hosting plan for your WordPress blog.
Don’t worry!
In this tutorial, I will show you how to signup on to Bluehost and choose the perfect plan to meet your requirement.
Steps To Buy Hosting
First of all, click here to go to their main website. You need to follow this link as it is a link pre-applied with the coupon code for your purchase.
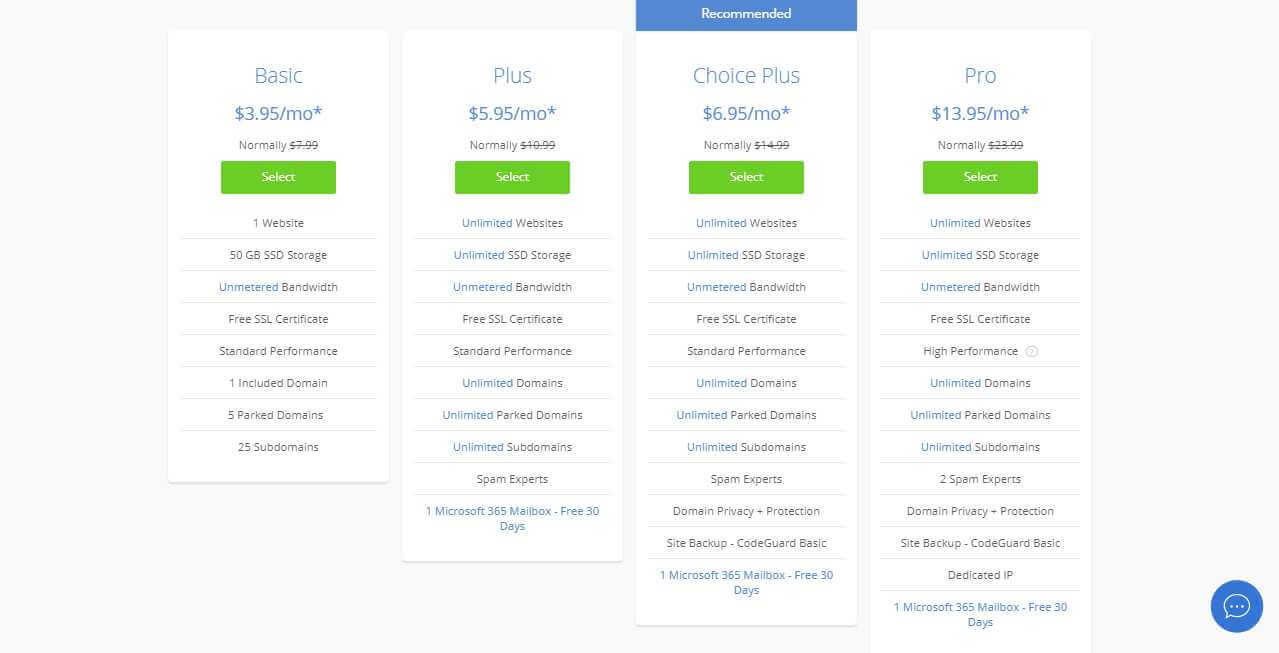
After Visiting the website, click on the “Get Started” button and you will be redirected to the plans and pricing page available on the Bluehost.
Select the appropriate plan you think best for your blog and click on the “Select” button.
You will be taken to the domain selection page. Where you can add your domain name you just bought or select a free domain offered by BlueHost (The free domain by BlueHost will only be provided on the yearly plan of BlueHost).
In the next step, it will ask you to create your account, you can sign in with the account details you created earlier and process the payment.
How to Host your Domain on BlueHost Hosting
If you bought the domain from Bluehost then you need to set the Nameserver of your domain so that you can access the content in your hosting with your domain.
Nameserver can be understood as the location of the hosting where you want your domain name to point and show the data available in your hosting. DNS contains the IP address location of the hosting. Nameserver enables the domain to search for the directory/hosting in this big world of the internet.
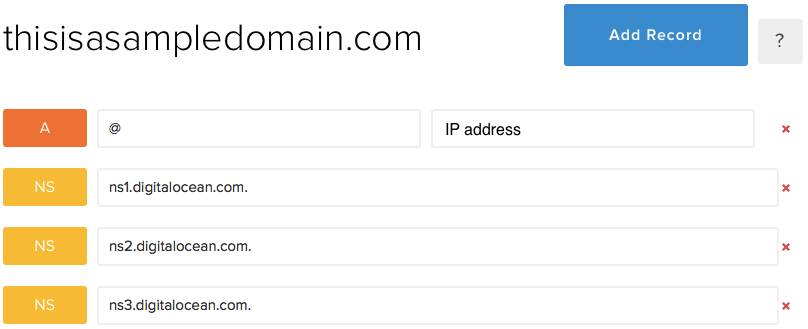
So in order to set up the Nameserver on the BlueHost, first of all, login into your Bluehost account and go to your domain and click on the Add Records tab available at your domain section of the Bluehost account.
Click on NS Record and add the nameservers or A records you received at the time of buying your web hosting. if you bought your hosting and domains from Bluehost then most probably the nameservers are set to Bluehost as default and you don’t need to change them.
If you bought hosting other than Bluehost, then you may be also given an IP instead of nameservers, in that case, add 2 A Records one with ‘@’ and one with ‘www’ as the name on the IP given to you.
5. Creating a Blog on WordPress
After you have bought a domain and hosting, the next step is to install and set up WordPress on your website.
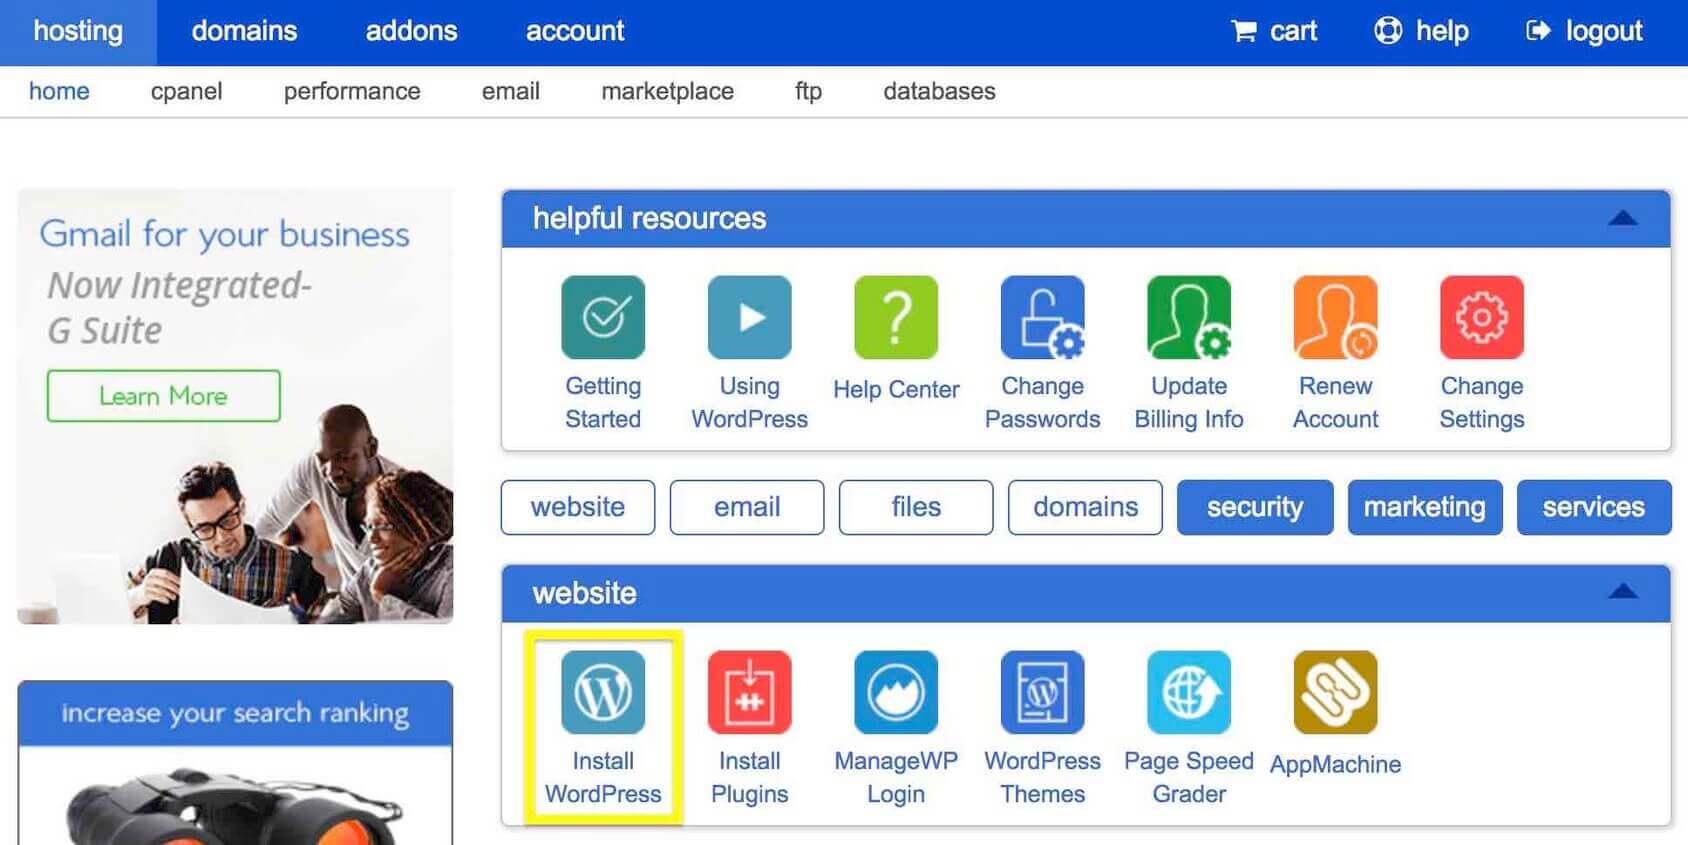
Just login into your hosting panel, and there you will see a one-click install option in the marketplace to install WordPress, click on Install WordPress and enter your domain name, leave the directory option blank and click on install now.
During the installation process, it will ask you for a bunch of options like the blog title, blog descriptions, username, passwords, etc. Just fill out the information and your blog will be ready to use.
You can also follow the video tutorial for a detailed method on how to install a WordPress on Bluehost.
6. Select a WordPress Theme to Design Your Blog
Choosing a theme in WordPress is a difficult task as the theme is one of the major factors of the speed and optimization of your blog apart from its looks. When it comes to blogging, speed matters. A few milliseconds will make a huge difference in the ranking of your blog.
So focus on the quality of the theme, while choosing a theme is a must. I will be suggesting the top 3 themes I personally liked and used, in this post.
1. GeneratePress
When it comes to the best WordPress themes, GeneratePress is one of the most optimized and efficient themes all of the time. GeneratePress is a lightweight theme, built-in pure vanilla JS which is just 30KB in size so no more render-blocking issues due to various javascript plugins.
GP Premium
- All Premium modules available.
- 1 Year of full updates and supports.
- Full access to all the available customizations.
2. Astra
Astra is one of the fastest-growing themes with 900k+ downloads. Astra is also the lightweight theme that guarantees the information and optimization of your blog. There are various pre-built designs available to choose from and you can customize the theme easily.
Astra Pro
- 1 to 1 support for any kind of issue.
- Addons for Elementor or Beaver Builder.
- Full access to all the available customizations.
3. Genesis by Studiopress
Genesis is a framework developed by Studiopress with empowers you to quickly design your WordPress blog with stunning great features. Genesis framework comes with various child themes which makes it highly customizable and easy to use.
7. Installing Some Important Plugins to Your Blog
Plugins are a piece of PHP code to extend the functionality in your WordPress blog. There are various kinds of plugins available for different kinds of functionalities.
WordPress is a CMS (Content Management System) with minimal functionality is to start a blog but to extend its functionality to various ends, we require plugins. There are thousands of plugins available for free to extend our functionality as per our requirements.
Some of the plugins which are essential to start a blog properly are:
1. WP Rocket
When it comes to optimization, no one can beat the WP Rocket plugin. WP Rocket plugin provides various optimization, modification, and caching functionality, no other plugin has. WP Rocket enables you to load your WordPress blog fast and ensure to keep your blog optimized.
You can also add CDN to your blog using WP Rocket, I have also mentioned a list of the best image CDN in the market on my blog if you want to check them.
2. RankMath
SEO is tricky but not with RankMath. RankMath ensures all the major and minor tweaks required for ranking your blog. It provides webmaster submission, sitemap creation, enables structured data in your blog, provides, and also provides you with all the basic on-page SEO while writing your post.
3. Updraft
What’s more important than having a secure backup of your blog with a feature to restore in a click. Updraft plugin provides you to schedule your backup timing and to choose from various remote options (Google Drive, Dropbox, etc) to save your blog data.
4. Wordfence Security
Wordfence protects you from various threats on the internet and ensures to keep your blog safe and threat-free. Wordfence enables firewalls to your blog and keeps you safe from malicious IP and providing the feature of 2 step authentication and limited login attempts to your website.
8. Write Content to Your Blog
So far, you have completed all the essential steps required to start your blog now the only thing needed for your blog is the content. Content is the source of our traffic as users will only visit your blog if they found essential content on your blog.
Writing content must be only specific to your niche. Make sure you only post what’s essential for your users and don’t spam your blog with useless content.
Always remember to be on point, while writing about any topic. Don’t write anything by making your own. Always try to provide the source for important references in your post.
Content is what drives you the traffic, so be specific and use easy to read language for your users.
9. Promote Your Blog Content
Content writing is not enough. You also need to make sure that it goes to your readers or users. For promoting your blog you need to do various off-page SEO. I am mentioning some of the important techniques to promote your blog content.
1. Submitting to various search engines
Submit your blog content to various search engines so that they know about your post on your blog. You can use the Google Webmaster to submit your site so that your website gets ranked in google and whenever someone searches for a keyword your blog also gets into the list.
2. Be active on your blog
Always be active on your blog with the latest content. Various search engines like google love the blog that posts on a regular basis and ranks them at the top of the rest.
3. Update the old content
Don’t just left your content as it is, always update your content whenever any new content is available for your post and remove all the old data with is no longer required on your blog.
4. Be active on various social media platforms
If you wanted to gain more traffic, then social media is the platform where you can find people interested in your niche. Just reach out to them and try to keep your social media updated with the latest content of your blog.
5. Create backlinks to your blog
The backlink is the process of getting your blog mentioned on different blogs and forums. You can get backlinks either by commenting on different blogs or by getting into various discussions on various forums related to your niche.
There are various off-page SEO techniques to gain more backlinks such as article submission, directory submission, social bookmarking, etc. which are also used to gain backlinks and enable you to rank higher in search engines.
6. Guest posting
Guest Posting is the method to get mentioned on the various websites by writing a post on someone else blog and mentioning your blog there. Guest posting is more effective to gain backlinks than commenting.
7. Advertise your Product
You can also advertise using Facebook ads, or Google AdWords so that it reaches the people and people will know about your product. Advertising is a paid method of promoting your product or brand but it’s effective enough to generate the revenue or trust of the people.
10. Make money from your blogging
After completing all the steps, the last thing left is to get monetization from your blog. If you are guiding a blog, then you surely wanted to start making money from it. There are various options available to monetize your blog.
Just go through all the options and choose the one best suitable according to the niche of your blog. You can also use various monetization together but sometimes using multiple monetizations may also result in lower the earning from one. So choose wisely.
Various options available to Monetize your blog are:
1. Google Adsense
Google Adsense enables you to earn from your traffic by showing ads to your users. It shows ads relevant to your users and to your content and provides earning on the basis of per view as well as per click.
2. Enroll for Various Affiliate Programs
If your niche is specific to any kind of product selling or signups, then you can use their affiliate programs to join and use it to make your users buy or signup and get paid.
Now a day every platform provides an affiliate program. Affiliate is far better than any other monetization method.
3. Selling Your Product
If you started blogging to promote your brand online, then you must have planned to sell your products online as well. If not, then give it a thought. Now a day, everything is online and people like to buy online more to save time and effort. So make your products to be available to buy online.
4. Sponsored Post
A sponsored post is the way to promote someone else product on your blog and charge some amount for it. It is the way of making money when your blog also has good authority, people will visit your blog for a sponsored post.
Final Words
To start a blog, all you need is the focus and determination to keep going. Blogging required time and if you are planning to rank your blog with SEO, then it’s a time taking process which may even take years to build up your brand.
So, be patient and start blogging, and success will meet you soon. Never let go of your dream of blogging with the fear of failure just remember that failure will never overtake you if your determination to succeed is strong enough.
Happy Blogging 😃…



Hi Sunny
This is quite a valuable share and it resonates with all the readers like me.
Very resourceful post. thanks to author for sharing.
very helpful post thank you for sharing