Does really Image optimization affect the traffic of your website? Is it even possible? Well, I know this question seems quite funny but what if I say Yes, Image SEO is a major process that affects the traffic of your website. Well, I am totally aware of the fact that this statement is quite undigestable for some of the newbies but trust me it’s true that if you optimize your images in your blog posts then the chances are you started to rank higher on Google and other search engines along with it, it increases your chances to show in Google Discover.
Some people will say that Yes, we do write alt tags to maintain image SEO, But mate that’s not enough image SEO is a lot more than just alt tags. I am totally aware of that fact as well that some pro bloggers will say to newbies that alt tags also not as necessary as I am telling you with Google’s recent advances in machine learning, well, Let’s take an example at Google Vision API.
For testing the google advancement in Machine Learning Let me take an image with a random name “ss-160826-twip-05_8cf6d4cb83758449fd400c7c3d71aa1f.fit-2000w.jpg” and also removes all the meta data from the image.
Here’s the result of the test:
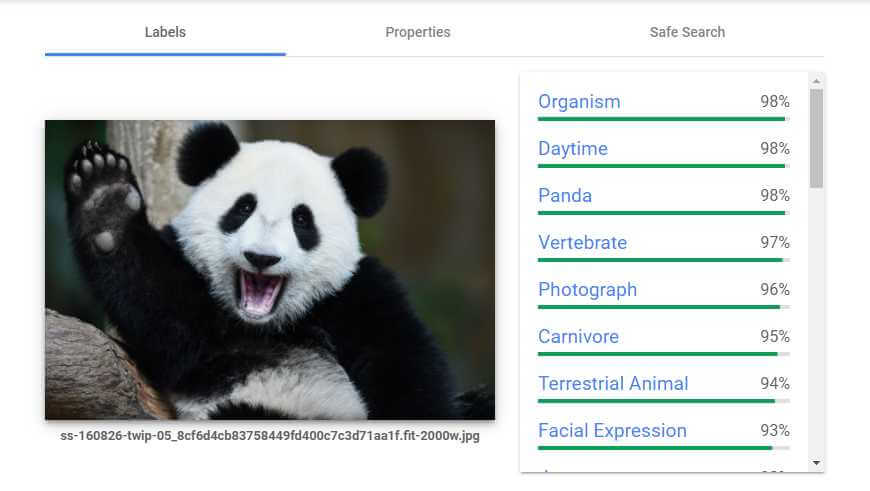
But still after doing all this, google detects the image perfectly with the help of its advancement in machine learning.
After this example, you will say alt tags is no more use for the image SEO.
So, Why I am saying to add alt tags anyway? Am I crazy?
Well, No I am not,
I’ll run through 6 actionable image optimization tips for more organic traffic. Let’s get going,
Table of Contents
1. Name your Images Appropriately
So, Yes, First thing first you have to name your image appropriately.
Well, You should make sure that whenever you add an image to your website you should check whether you have added a name in your images or not.
Let’s have a look at what Google says about images
[…] the filename can give Google clues about the subject matter of the image. For example, my-new-black-kitten.jpg is better than IMG00023.JPG.
So to know for sure, lets again check this naming theory again with some different image with the help of Google Vision API and check its result.
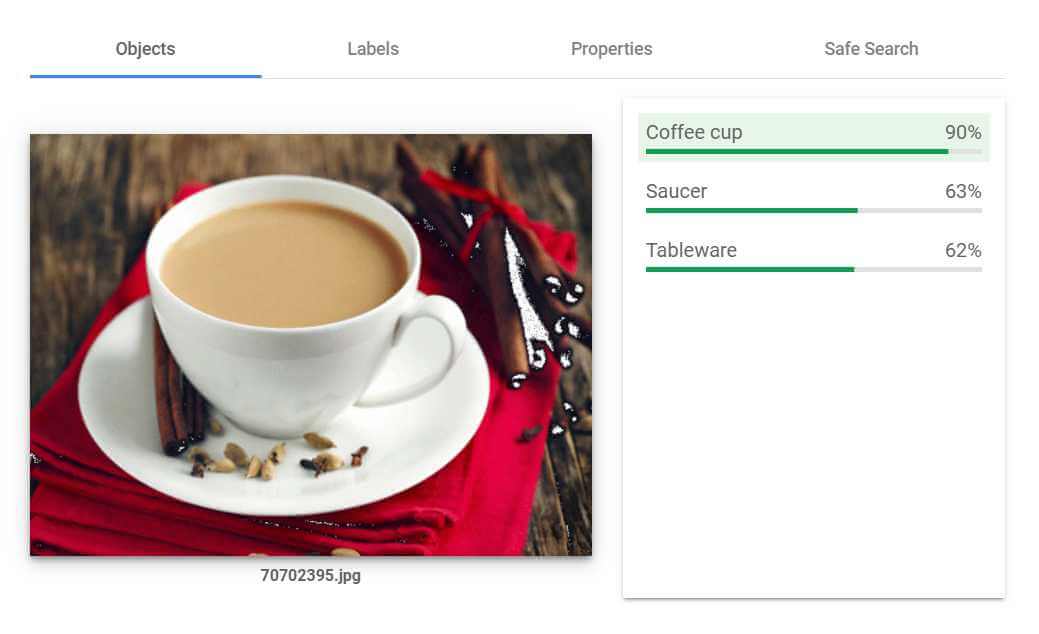
So, As you have seen already in the mentioned image, It detects various labels including tableware and saucer and according to google machine learning, they are 90% sure that it can be a coffee cup but actually, the image is Tea.
We are aware that Tea and Coffee do look similar but we also know that Google is not perfect at all. So, It is up to you to take care of these things to improve the ranking of your images on Google.
Are you thinking about keyword stuffing? Well, If you are thinking about it just make it simple and descriptive.
For example,
- Good filename: tea.jpg
- Bad filename: teacup-tea-cup.jpg
It won’t take you so much time and for a better image optimization that is worth your time.
We all know that the images on the web come with three file types such as JPEG, PNG, and GIF.
Each type of image works totally differently each one of them uses a different compression method. That simply means that three of them has different size of the file. Now, Are you wondering is this important to take care of? Well, just click here and find out why is it so.
This is a totally basic knowledge that page loading time is very affecting for SEO it is totally a ranking factor on mobile and desktop too.
Now, What you need to do is to choose the most appropriate file type for each image i.e., the one that offers the best compression with the least reduction in quality.
Here is the example of the same image as a JPEG, PNG, and GIF:

As you can see that it is a total win-win for JPEG image. It has the smallest file size among them and there is not a minor difference that can be noticeable between the other two images, So, Isn’t it a smart move to choose JPEG over the two others?
So what is the actual difference between these different types of images?
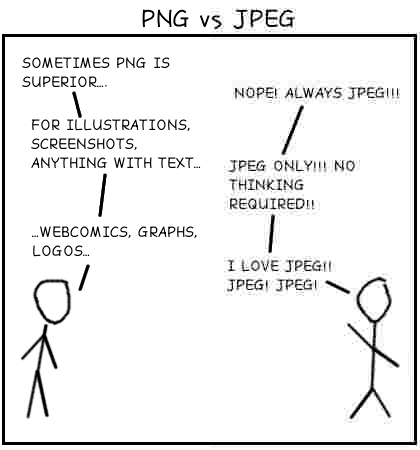
Well, this image is your answer as you can see that in the image PNG is more clear as compared to JPG file type. Well, JPEGs are the best format for photographs, whereas PNG’s are best for line drawings, text, etc. GIFs are best for moving images. Now, I guess you know how to choose the perfect image file type for you.
3. Decrease the File Size of Your Images
Firstly just have a look at these two images
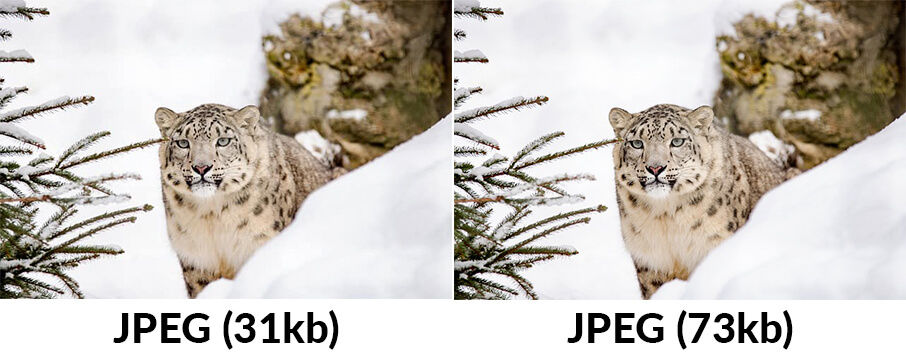
These both are JPEGS. I guess you found a little minor difference in the quality of these two, Yet, first one is 58% smaller than the second one.
Google has some seriously extensive documentation on optimizing images for the web.
Google is a little helpful here Google recommends three open-source tools to help with this::: Guetzli, MozJPEG (by Mozilla), and pngquant. If you are not sure how to use these so just click here to read their guidelines to use these tools. Just in case you are not comfortable using these tools and if you are a Mac user Google recommends you to use Imageoptim – A free tool for Mac users
Just drop your image and thy will be compressed, Isn’t it cool?
You can easily change the level of compression through settings and many more things you can manage.
It also strips EXIF data by default. That helps to further reduce the file size—albeit not usually by much. You can use this free web-based tool (officially recommended by Google) to strip EXIF data if you plan not to use ImageOptim.
How much effective result these tools are actually giving, I decided to take a little experiment I took small 15 images as a sample — some are JPEG and some are PNG I threw them all into this tool on the default settings. I did the same for a few other alternatives.
Here’s how they fared in terms of average file size reduction:
Imageoptim: 69% (JPEG). 40% (PNG)
Shortpixel: 42% (JPEG). 59% (PNG)
Kraken.io: 13% (JPEG). 63% (PNG).
TinyPNG: 27% (JPEG). 65% (PNG).
Optimizilla: 27% (JPEG). 60% (PNG)
Imagify.io: 6% (JPEG). 1% (PNG)
Compressor.io: 42% (JPEG). 58% (PNG)
If we see and go with the Google recommended tool that is Imageoptism that is very effective for JPEGs but at the same time, It is the worst for the PNGs.
So, If we just talk about the result with the default settings Shortpixel appears to be the best all-around image compressor.
If you are a WordPress user then it is more beneficial for you because there’s a ShortPixel WordPress plugin. It’s free up to 100 images per month.
Various SEO agency also suggests optimizing the size of your images for better performance and speed of your blog, Optimizing also helps you to minimize the size of your post and also reduces the bandwidth usage of your server.
4. Create an Image Sitemap
See what Google says about the image sitemap
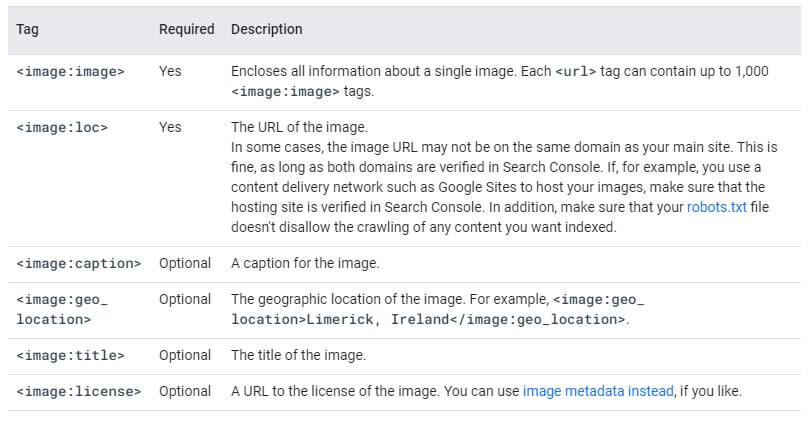
These are the tags that you can use in image sitemaps:
If you are a WordPress user and using Yoast SEO or Rank Math, then it is obvious that images would be added to your sitemap automatically That’s even true for sites that have the “media” pages set to noindex. (Note: That is now the default setting in the latest version of Yoast.) However, Yoast only includes the required <image:image> and <image:loc>
But if you add captions to your image in WordPress then, unfortunately, Yoast does not add these.
Now, In this case, you have to add those by yourself manually,
As per Google, these are the tags which you can use for Image Sitemap:
If you are using CDN for images then Google also states that:
Image sitemaps can contain URLs from other domains, unlike regular sitemaps, which enforce cross-domain restrictions. This allows webmasters to use CDNs (content delivery networks) to host images. We encourage you to verify the CDN’s domain name in Search Console so that we can inform you of any crawl errors that we may find.
That’s useful to know if you use a CDN to host your images. CDN are best way to provide images in your website, but its important to follow the SEO rules for them as well. We will cover the image CDN more on the later section.
5. Use Vector Graphics For Appropriate Images
We are aware of the fact that most of the websites use vector graphics for their logo and other simple on-site-elements.
Basically, SVGs are the most popular vector format on the web. The World Wide Web Consortium (W3C) developed them and they’re based on XML. As such, all modern web browsers support them.
Do you know what is the best thing about SVG? It does not bother what browser, Device, or screen resolution you have, SVG will look perfectly clear as they do not pixelate. You could display a SVG on a screen the size of a galaxy—it wouldn’t lose one ounce of quality.
Here are Google’s suggestions for optimizing SVGs:
- SVG files should be minified to reduce their size.
- SVG files should be compressed with GZIP.
Their recommended tool to minify SVG files is svgo.
Some of you will find yourself uncomfortable using a command-line interface, Isn’t it? Well, Don’t worry at all, Use this web app or this Mac app to do the same thing. Both offer a simple drag and drop interface for minifying such files. I do prefer the web app.
The mentioned screenshot will give answers to your queries As you can see that the original size of the SVG was 8.54kb. That’s insanely small. The minified (and gzipped) version is even smaller at just 3.56kb—a 41.67% saving.
Gzip compression is something that is enabled at the server level. In other words, the SVG above will only use 3.56kb of bandwidth if the server allows—otherwise, it will use 8.54k.
Use a tool such GTMetrix to check whether gzip compression is enabled on your server. Follow these instructions to enable it if not.
6. Lazy Load Your Images
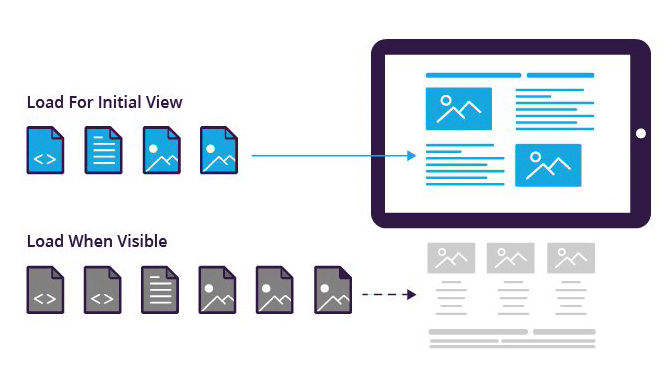
Lazy loading is an essential factor that should be taking care of for the betterment of image SEO. Well, another name of lazy loading is asynchronous loading, which basically means it defers the initialization of an object or image until the point at which it is needed.
It can help to save bandwidth, reduce the page size of your website, and boost website speed, Along with it, it saves the resources of your server, so it works efficiently and flawlessly. It is pretty cool, Right?
There are various plugins available through which you can easily enable lazy loading on your website. Well, there are many cache plugin available that supports lazy loading but if I would have to suggest any that would be WP Rocket. It really helps to optimize your website’s overall speed and provides features like lazy loading images and iframe.
Here is an image from medium.com describing how lazy loading works;
Wrapping up!
Image SEO is really a complex topic to explain and to understand too. Well, there are thousands of documentation on the matter. Their page about automating image optimization runs more than 15K words.
That is why it is important to let you know that I haven’t covered everything in this article. That would be quite next to impossible to cover everything in this one post. We have covered almost every ‘Big’ element that should be taking care of in a serious manner.
I believe if you will take care of these tips while adding an image to your website that will surely give you the outcome. I do use these tips on my websites too and I see the result as well. I tried my best to explain why optimizing images on the website is essential.
If you have any suggestions or queries regarding this post feel very free to comment that down and we will glad to read them out. We hope you found this article helpful. Do not forget to share this with your family and friends.
Stay connected for our upcoming posts.

